Showing posts with label For my kids. Show all posts

Wednesday, December 16, 2020

Baby Candy Canes

    First Candy Canes
 
This one was made by my son when he was about 2 and a half years old.


           Christmas is a perfect time to get out the finger paints for you child or children.  Tag board or a file file is a perfect weight paper to work on.   The file folder stays in place and does not wrinkle or bend with the movement of little fingers.


        I drew the outline of  three candy canes on a file folder. Then the  red finger paint came out!!! Oh what excitement!! The squishy feeling of paint on your fingers.  The paint is applied to the paper with such zeal! 

         After the paint was dry, I cut the candy cane shapes out.   Of course the names of the artist and the year were written on the back to look into the past many years from now.

       This is my 18 month old granddaughter's candy cane for this year.


      My daughter made this candy cane below, more than 30 years ago.  She was about 8 months old at the time.   It looks as good as new!  These fans canes are always hung on my tree with care just like the fragile glass ornaments.   They are so precious to me!

   
          These precious candy canes will have a special place on my tree every year.

     Christmas tree ornament don't have to be made of finest silver, gold, or crystal to be cherished.  

Hoping everyone has a very Merry Christmas! 

Beti

Monday, December 14, 2020

Felt Santa Ornament

HO, HO, HO! 


           It is never too early to start planning for Christmas.  If you like to make handmade ornaments like I do, you need to start thinking about it now!
   
          I was browsing though Christmas ornaments in a small shop in Minnesota a few years ago and came across stuffed felt Santas.  I knew that I could make them. 


      So off I drove off to JoAnn's to pick up some red, black, and white felt.  I was out of town in Minneapolis at the time, so I didn't have all my felt scraps on hand.


     These are the little guys I came up with for my granddaughters that year. A little embroidery and a little stuffing. At about six inches tall, they are the perfect size for little hands. My Santas came together quite quickly. No sharp edges to poke a finger or loose eyes to come off. These little Santas can easily hang on the tree or can be played with and taken to bed for a nap. 


    Happy Santa Making to all and to all a Good Night! 

Beti

Monday, December 7, 2020

Felt Snowmen Ornaments

 Snowmen Ornaments


             Every year I make felt Christmas ornaments for my grandchildren.   Each year the ornaments take on a new design.   Last year Christmas trees were sewn.    This year I chose snowmen.   I try to give each their own individual personality.   This way the kiddos will be able to recognize their ornament. 

            On the back,  the year and the child's name is stitched.   I experimented with the decorative stitches in my sewing machine.   As you can see the snowman on the left has the years stitched by machine.    It wasn't exactly what I wanted, so on the other snowmen I did the year by hand.   Granted it took a little longer, but I think it looks much better.


             The faces are slightly different as well as the hats.   Each and every snowman made out of snow looks different.   Some are big and some are small.    Some are wearing hats or a scarf around their neck.   Some snowmen have sticks for arms and a carrot nose.   So these felt snowmen should be individuals, too!

              This smiling fellow has sparkles on his hat and a piece of  red ric-rac  to hang on the tree.


            This jolly  snowman ⛄ has a cute little smile with a green ribbon hanger.

         Give these little felt friends a try for you favorite children this Christmas.   You might even start a tradition, too.    Hopefully, these snowmen will hang on the branches of Christmas trees for many years in the future.

Happy Sewing!


Beti

Monday, November 23, 2020

Turkey Finger Puppets

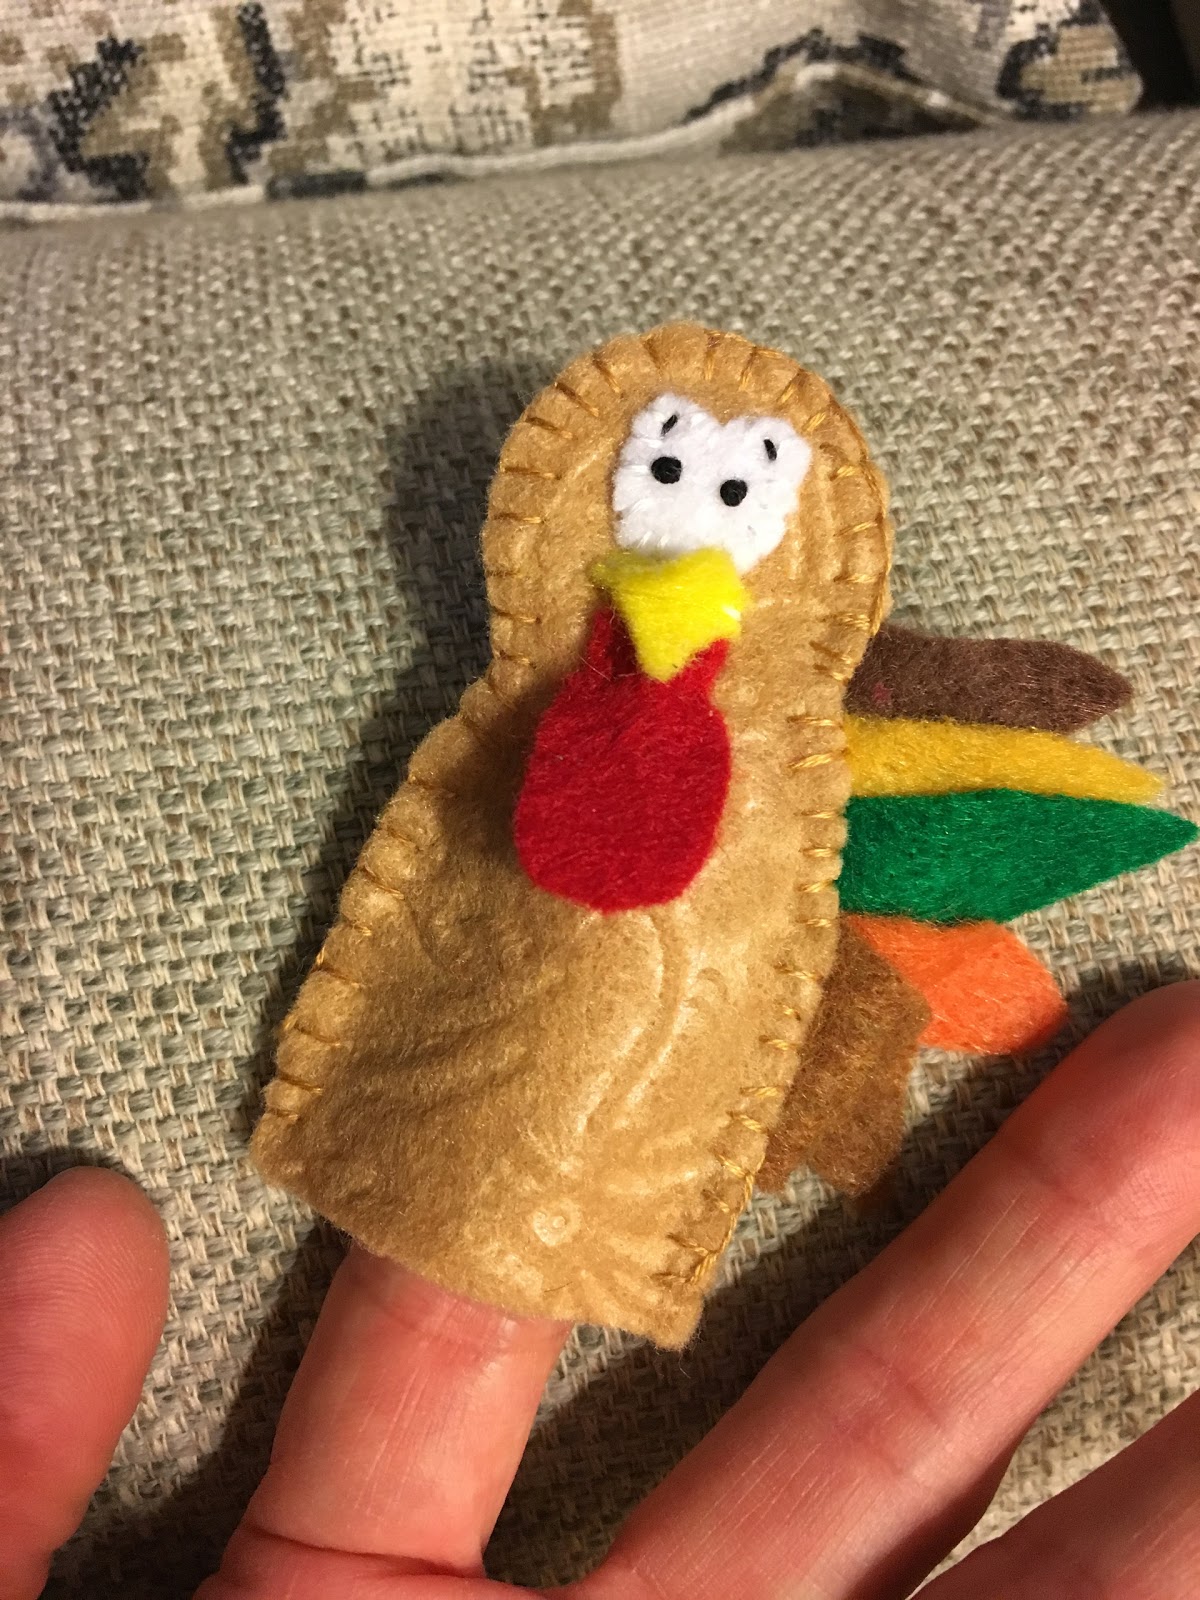
Gobble, Gobble!

       Thanksgiving will be here before you know it,   but a cute little turkey can be fun to play with any time.  Now is the time to make these cute turkey finger puppets for your kids in time for Thanksgiving!
    

       I know this guy has a frightened or startled look on his face.   You would to if you or one of your friends were on the menu for Thanksgiving dinner.

       I like to create felt finger puppets for my granddaughters, nieces, and nephews.  Having a large scrap box of felt comes in very handy when these little friends need to be made.    As you can see, the smallest scrap of felt can be used for feathers, a beak, or eyes when making a felt finger puppet.


      These little finger puppets are only about 2 1/2 inches tall.  They are appliqued and then stitched together with embroidery floss.    I don't use any glue.   They are very soft and lovable. Each turkey has a little yellow beak that opens.   Gobble,  Gobble!


        These turkeys were a lot of fun to make. They would make a great addition to my Old MacDonald felt set. Here is the link if you would like to see the rest of the farm animals.

http://betikempa1.blogspot.com/2017/01/felt-old-macdonald-had-farm.html

Here is the horse.


   If you like finger puppets, give these a try.

Beti

Wednesday, November 18, 2020

Felt Nativity with Finger Puppets

Nativity Play Scene
and Finger Puppets


     It is never too early to start planning for Christmas!

      I decided to make felt Nativity scenes for my granddaughters to play with.   They needed something unbreakable and quiet to interact with for a quiet play activity.   The Bible story of Mary and Joseph coming to a simple stable for the birth of Jesus was the perfect setting for this felt play set.    Nothing too fancy, just the basics.


      Making the finger puppets a was  the beginning of the project.   Mary, Joseph, and Baby Jesus were the first to be made.    Two of each were stitched from small scraps of felt and embroidery floss.     Mary is about 3 1/4 inches tall and Joseph is about 3 3/4 inches. Each is about 1 3/4 inches wide.


       A small brown manger with hay has a pocket for the Baby Jesus to sleep peacefully. The manger is attached to a pocket in the stable.   With this pocket,  Mary and Joseph are able stand in front of or behind the manger to watch over their new born child.


     The Three Kings are different heights in the same range as Mary and Joseph.  They are each carrying a different shiny gift.   As I said before,  nothing fancy but durable for many hours of play by little ones.


        This Nativity scene would not be complete without a donkey.    Mary rode on  the donkey's back on the long journey to Bethlehem.   We all remember the "Little Drummer Boy" song during the Christmas holidays.      A little drummer boy finger puppet was added so the girls could sing a song when they play.


          A smiling angel is always around to protect and watch over the Christ Child.   You can see the angel standing behind the manger.    The angel is able to watch over the Holy Family in a small pocket near the star on the top of the stable.    The star will guide the Three Kings or Wise men to see the New Born King.


        The play scene has plastic canvas in between the inside and outside.   This plastic sheet gives the felt strength and helps the Nativity play scene to stand up on its own.   Felt pockets are secured to the insides of each panel.    The pockets are designed to hold the finger puppets in place when the scene is closed after play. 


          As you can see, the " tan colored ground" folds up into the play scene.    The two sides fold in and are secured with velcro.    A handle made of green grow grain ribbon was stitched on so that this play set can be easily carried by a young child.

           I hope this Nativity Play Scene will give you the incentive to make something like this for a young child that you know and love. 
    
Happy Sewing!

Beti

Tuesday, November 17, 2020

Christmas Wreath


            Since Christmas is right around the corner, a hand print wreath would be a good project on a cold day for an 18 month old.    As you can see, some green hand prints are distinguishable, but  most are more of sliding hands across the paper.      We worked on those little red berries for a finishing touch.

        I did not want it to be perfect because this is the art work of a toddler.
When she gets to preschool, kindergarten, or 1st grade her teacher can tell her
to make beautiful hand prints.    Good luck with that!     I didn't want to upset my granddaughter. 

        To make this look more like a wreath, I did cutting.

       The bow hand prints were left over from the candy canes we worked on the day before.     "Waste not, want not" when working with a toddler or any child on an art project.

       This wreath is being sent overseas to her DADA who has been deployed.  So make sure your package gets sent out early enough to get to its destination in time.
I hope this wreath will  make his time away a little easier.

            Merry Christmas 
 to all our service men and women who are spending the holidays apart from their families.


Beti
 

Thursday, November 12, 2020

North Pole Finger Puppets

Finger Puppets

       My latest finger puppet collection centers around the Arctic regions of our world.  Brrr!    These are made of small pieces of felt stitched with embroidery floss so they are warm and cozy little friends.


            A cute white seal pup and polar bear are found in the cold arctic.    The seal pup has a worried look on his face sitting next to the polar bear,  though I don't think the bear will bother him.   The polar bear is very friendly.

        I added a snowman just for some added fun.  We know how Frosty likes to dance and play in the snowy and cold weather.   Of course Frosty has to have a bright red scarf around his neck to keep away those cold winter winds. 

         Lastly, a penguin was added to the group of felt friends.    I know penguins don't live at the North Pole,  but this one begged me to include him with the other cold weather friends.    So, please explain to your little ones that penguins live at the South Pole not the North Pole.

         I find these finger puppets great for dramatic play or a quiet time activity for preschoolers.    Songs  can be incorporated with finger puppets easily.   They can be taken in the car or on an airplane trip to keep a child occupied for a period of time.    Hide and seek is easily adapted with finger puppets in the confined space of a car seat.    The child can close their eyes and the parent could hide one or all of the finger puppets to find.


        The little boxes are made from Altoid tins.     I stitched a small piece of North Pole flannel fabric, that I found at JoAnns, to a piece of felt.     The felt was then glued to the top of the tin  with tacky glue.      All four little chilly friends fit perfectly into the tin for safe keeping.

          I made two sets, one for each of my granddaughters.     They are slightly different so there is no confusion when clean up time comes around.  

       You can view other finger puppets ( Halloween collection,  Baby Sharks,  Moose finger puppets,  and Animal Bed Tins) in previous posts if you are interested. 

       Enjoy the wonderful day! 

Beti 

Sunday, November 8, 2020

Gooey Play

    
Goo 
and More Goo!

            Today I mixed together  2 T. of sugar and 1/4 cup of cornstarch.   This mixture was added to 1 cup of cold water in a small sauce pan. I found this recipe on one of Martha Stewart's blogs. ( Martha Stewart's recipe calls for 4 T. sugar, 1/2 cup of cornstarch, and 2 cups cold water).   Then sugar and cornstarch was stirred into the water heated over medium heat.    Stirring constantly while heating the mixture began to thicken.   When heated and stirred the mixture will be smooth.    This mixture will continue to thicken after it is removed from the heat.

            I stored the gooey mixture in a plastic container.  You can add food coloring to make a "finger paint" if you wish.  I did not try this.  We were thoroughly entertained with the white goo.  
        
                As you can see, this toddler used her Ernie in the goo.   Just another addition to the the tactile experience.
          
            I did let my little one spread the goo on a blue sheet of construction paper.  Prior to the activity, I used masking tape to form the outline of a snowman .  After the goo was applied to the paper, coarse salt was sprinkled on the goo to give a snowy effect.   You can see where the masking tape was removed from the paper.

     
  I'm not sure which way the paper is turned to look more like a snowman.   This did not turn out the way I had planned.    Oh well, sometimes you have to take the good with the bad.   I always tell my kids that I learn something new every day.    I guess I'll have to do a little more experimenting with this goo. 


          This was a good activity for a January day or any rainy day during the spring or fall.   There are some days we could not get outside to play.    January or any winter month in Michigan can be a difficult time to get your kiddos out doors for play time.


 Enjoy the day!  I will!
     Beti

Tuesday, November 3, 2020

Flannel Stuffies


Flannel Stuffies Pocket Pals


          I love to wander through the flannel aisles at JoAnns!   The colors and patterns are so much fun.    Cars, animals, dolls, monsters, spacemen, holiday designs,  I could go on and on.


              I found a flannel fabric with polar bears holding fish and wearing hats and cozy scarfs.    How Cute!     The tallest bears are about 4 1/2 inches tall and about 2 inches wide. Some are smaller about 2 1/2 inches tall and just as cute. 


      First,   the bears were cut apart so they could be sewn.   Each bear piece was placed on felt and sewn around the figure.   Stuffing was adding and then the open edge was sewn together.   Finally, the edges were cut with pinking shears.

 
        This was an easy little project.  Hopefully the grandkids will enjoy playing with these new soft friends.

Beti 

Tuesday, October 27, 2020

Ninja Finger Puppets


Ninjas! Ninjas!


            We see ninjas everywhere!    If you have read my blog,  I love to make felt finger puppets for my grandchildren and grand nieces and nephews.   In talking to my nieces, they mentioned that their boys like to play ninjas with their friends.   I should have known that.   So I decided to make a set of felt ninja finger puppets.

            A couple of years ago while on a family vacation, I gave each grandniece and nephew a little Altoid box with a little felt animal inside.    They were a hit with the kiddos.   So now when I get to visit the kids, I like to have some little handmade toy to play with. 

           My felt finger puppets are made from small scrap felt pieces.    These little guys are about 1 1/2 inches wide and 2 1/2 to 3 inches tall.      They are big enough to fit comfortably on your fingers and those of children, too.    I cut the body and other shapes free hand so none are exactly alike.      With a "pattern in my "mind's eye", the finger puppet begins to take shape.    So if you are going to make these, pick up your scissors and begin to snip here and there.      As you can see, black, browns, grays, and a green felt were used for the bodies.      Tiny scraps of red, yellow, and black were used for their belts.


             The only part that was hand stitched were the tiny eyes peeking out from each mask. The rest of the sewing was done by machine.   (Many of my finger puppets are completely hand stitched, but I wanted these to be a bit more durable because the boys will be playing with them.  

      Ninjas can be educational, too! 
             These little warriors can always be used for counting, sorting,  and matching activities.    Matching the belts or the color of the clothing could be fun.     Properties of same and different can be used in sorting.   They can also be placed in order from smallest to largest.      The educational possibilities  are endless.


          Give these little fellows a try if you enjoy making felt finger puppets!  I  do hope some lucky little boys and girls enjoy their ninjas!


Beti

Sunday, October 25, 2020

Fabric Travel Doll House

Fabric 
Doll House 


              There have been so many fabric doll houses on Pinterest lately.    Or maybe they just started to catch my eye.  I enjoy making toys out of felt and different kinds of fabric, so fabric doll houses would be a natural progression for me to try to work on.  


               Here is a look at the inside of my fabric doll house.      The house lays flat and can be folded for easy storage.      It measures 26 inches from top to bottom and is 2 and a half feet across.       At this point you can see pins around the edges of the house.      I was beginning to hand stitch the house together.
   
       The central section has a light blue gingham "rug" on the floor.      The back wall has the table and two chairs.      An large ice cream treat is waiting on the table to tempt anyone who comes to visit.      Hung on the back wall is a festive banner ready for any celebration.


         There is a picture of the family dog hanging over the warm cozy fire place on the left side wall.        Across the room is a Christmas tree with a smiling snowman button behind the ladder that leads to the upstairs loft


           The embellishments were made from scrap flannel fabric and stitched securely onto  the base fabric before the house was assembled.

         The green lawn is felt with a burlap path winding through the middle.  A small pond, trees, and flowers add to the outdoors feel. 

 
           The outside of the fabric house is also embellished.     A black front door with a button door knob is surrounded with a green vine with yellow flowers.       The vine was machine stitched and the flowers and French knots.     Next to the window is a felt mailbox and a tiny pink button flower to add contrast and dimension.     I stitched their last name on the mailbox in place of  the white label.     One side of the house has a wildflower garden made from assorted colorful buttons with machine stitched stems. 

         At the top of the picture you can see the striped roof with a pink ribbon.   This will become the carrying handle once the house is folded up.  If you look closely you can see loops sewn around the outside edge of the roof and front of the house.   These will be used with buttons to securely close the house when your child is finished playing. 
 NOTE:
      After my granddaughters played with their houses for a while, the elastic loops became unattached.     I will need to use velcro to make tabs to close the house more securely.       I learn something new every day!    And I am not ashamed to make mistakes.  That's what I told my students and now what I tell my grandchildren.    Live and Learn!


      The house walls and floor are reinforced with sheets of plastic canvas.  These light weight  sheets of plastic make the walls sturdy yet flexible. 


        Recently I  made some princess finger puppets which were  the perfect size for this play house!

             
            As  you can see the house has been played with and is quite durable. It takes the strain of a toddler sitting on and it it.

     This little house was so much fun to make and embellish.

  Happy Sewing!


Beti