Thursday, March 26, 2020

Holy Week Cube

          Holy Week

     The Felician Sisters helped start St. Michael Catholic School more than 75 years ago.  I am pleased to say that I  have taught at St. Mikes for 25 years and worked with these wonderful dedicated women. 
           When I first started teaching, two wonderful Felician sisters, Sister Helen and Sister Therese, directed  Religious Education for the school and parish.  They taught workshops for the teachers after school so we could receive our religious certification. I was given many handouts to use in my classes during these workshops.
               This Holy Week cube is a wonderful visual reminder for my students as they journey into the Holiest Week for Christians. 


   The six sided cube has line drawings of the crucified Christ, dice, wheat, bread, coins, and palms to signify important aspects of Holy Week.  Once colored and cut out,  it is folded and glued together to form a cube.


       Here are some samples of my student's cubes this year.


         I do hope that someone will be able to use this Holy Week Cube with their students. I know that sisters Helen and Therese would be so pleased that their 
workshop handout was being used with a new generation of Catholic children during Holy Week to remember the Passion.

     Remember the true meaning of Easter.

Beti 

Wednesday, March 25, 2020

Color Matching Game

   Color Matching       

       Learning colors is a skill every child needs before they begin school.   Here is a very simple little game to make for your little one. Nothing fancy, but it works.   This is the least expensive children's activity that I ever made. Free! Free! Free!

      I went to the paint section of my local home improvement store to get paint chips.  There I looked for primary colors. Two of each, red, orangeyellow, green, blue, purple, pink, black , and brown were  the colors I choose.  The colors in the piture don't show up as they are to the eye.     ( You might want to get  sets of 3 or 4. Then if one gets lost there is no problem). 

        Different shades of colors may be used with older children. These children will be able to see the difference between lighter and darker colors. You could make a set with colors in the red, green, blue, etc.


      These paint chips were were trimmed down to fit into a small tin box. Altoids come in these great little tins.  They are the perfect size for little hands.  Mom can slip these into her purse or diaper bag for a quiet activity when needed. 

     With the left over trimmings, I made a rainbow arrangement of colors on the lid of the tin.  This will help all the colors get returned to their little tin when not in use. 


      An 18 to 24  month old can match the colors to begin with.  The names of the colors will also be mastered with this simple game. The color chips can also be used to match other objects such as pom pons, crayons, clothing, toys, etc.

     The great thing is that the whole thing is free and can be replaced at any time. 

Enjoy every moment with your young child.  They grow up so very fast!

     Today I have linked up with Doodle Bugs Teaching for the Five For Friday Linky.  Lots of great ideas are out there.  So hop on over and take a look.
 www.doodlebugsteaching.blogspot.com

 Please leave a comment if you have a spare minute.

Beti 

Tuesday, March 24, 2020

Easter Basket Envelope


          Now that we are working with our children at home, this is an easy project you can do at home with a white business envelope. 

         A simple business size envelope can easily become an Easter Basket envelope for your kids to make.


        I started with a standard business size envelope because local businesses had donated their old, out dated envelopes to our school.  Why buy new when you can reuse?  As you can see, I drew a dashed line about 3 inches from the left hand side of the envelope.  In this way the printed return address can be cut off  and discarded.


      That section was cut off. 

         Then I found the center of the remaining envelope and cut the flap into a triangle.

         A triangular section was cut out of the middle of the flap to create a handle for the basket.

          Finally, the left side of the envelope  is glued.  Now the decorating begins. As you can see, these were given to our 1st grade buddies.  So names were written on the front or back of the envelope to ensure delivery. As you can see we tucked our Easter cards into the completed envelope Easter baskets.


           A very easy  project for 5th graders to work on. If you are making these with younger children, an adult might have to do the cutting and gluing ahead of time to get the size correct. Then, have the kids do the decorating.
          
          These could also be used as place cards for your Easter dinner table. You might even fill each with a little Easter grass. Grandma and aunts will be impressed with their personalized name cards.  Let your children be creative and help decorate.


          Today I linked up with Doodle Bugs Teaching   
 five for FRIDAY weekly linky party.
www.doodlebugsteaching.blogspot.com 

          Please leave a comment.  I'd love read your thoughts and ideas.

            
   Enjoy Spring!
Beti  
          

Monday, March 23, 2020

Moose Finger Puppet

           Last summer a moose crept into my life. 


           My granddaughter came to visit.  Before she arrived, I had gone to the local  library. Our library has a Used Book Cellar.  Of course it is down in the basement of the public library, hence the name.  I found the book, "If You Give a Moose a Muffin" by Laura Joffe Numeroff and illustrated by Felicia Bond. The book was in perfect condition with the dust cover without a wrinkle or tear. I picked it up for one dollar.  I couldn't resist!


            This cute story quickly became a bedtime favorite. We read it together over and over enjoying the story and pictures. The illustrations are so very inviting.  They tell the story so well. Even small children are able to retell the story in there own words from the illustrations.

            The summer then lead us "up north" in Michigan for a short vacation. 
Michigan is known for Kilwins Chocolate Candy and Fudge.   We took a walk in the small town of Harbor Springs one night after dinner.  We ran into a very friendly moose!


            The moose was standing in front of Kilwins to welcome all the passers- by.  My granddaughter was amazed by this moose!  Had the book come alive just for her?  They do look similar.  The two  danced and teased each other for the longest time. 

            Well on the way home in the car, I decided that a MOOSE finger puppet needed to be made. I always carry my small box of felt and embroidery floss with me when I travel, just in case I get an inspiration for a felt finger puppet.
Here is my Moose.  He is kind of cute, in a "goofy and outdoorsy" sort of way. I tried to capture the silly moose my granddaughter had encountered this summer in Michigan.  As you can see I took this picture in the car.


          Finger puppets can be a fantastic manipulative for young children. They are easy to handle and do not take up much space.  These travel well and are great for quiet activities. Felt is quite durable, inexpensive, and easy to work with. Even a beginner can stitch up a finger puppet. 

          You can see my "Five Little Monkeys" finger puppets at the link below.
www.betikempa1.blogspot.com/2017/01/five-little-monkeys.html 

          I store my finger puppets that are made in little Altoid tins. The lids closes tightly for safe keeping. A small piece of felt is glued onto the cover of the tin with tacky glue.  Each tin has a different color felt on the lid. The child knows by color which finger puppets  are stored in each tin.


          So, the moral of the story is, if you happen to run into a moose some day, keep an open mind.  You might enjoy the journey.  I did!

      Please leave a comment if you have a spare minute, I'd love to hear from you.

Beti

Sunday, March 22, 2020

Hickory Dickory Dock


    Hickory, Dickory, Dock

     One of my favorite nursery rhymes is Hickory Dickory Dock.  Most children enjoy this nursery rhyme, too.
    
       Recently I watched a version online that involved a mouse and also a snake, cat, squirrel, monkey, and an elephant! Who ever heard of an elephant in this nursery rhyme? My granddaughter was enchanted by this video and song, especially the elephant. Of course, at the end the elephant goes up the clock.  Then, the  clock begins to creak and becomes smashed under the tremendous weight of the elephant.
    
     So as usual, I decided it would be fun to have a felt clock and some animals to sing and retell Hickory, Dickory, Dock. As you can see, I made a very basic grandfather clock and mouse to begin the song.


          Here is a silly little cat to add to the fun.


      I also had a lot of fun making this elephant.


        These felt animals and the clock are small enough to fit into a sandwich size zip lock bag.  I wanted to make it easy and small enough to fit into a diaper bag. It also had to be a good size for toddlers little hands and fingers to play with.

       Please spend as much quality time with your children as you possibly can. You won't regret it.  Some day, when they have grown up and have their own children, they will say that they remember when you played with them and sang, "Hickory, Dickory, Dock"!


Today I am linking up with Forever in Fifth Grade  for January's Show and Tell Tuesdays. Check out all of the January ideas that are included this month.
www.foreverinfifthgrade.blogspot.com

       Please leave a comment if you have a minute.  I'd love to hear from anyone who reads my blog.

Beti

Friday, March 20, 2020

Felt Vegetables


  Felt  Vegetables


       My family was having baby shower with the theme
 " A Farmer's Market ".
     
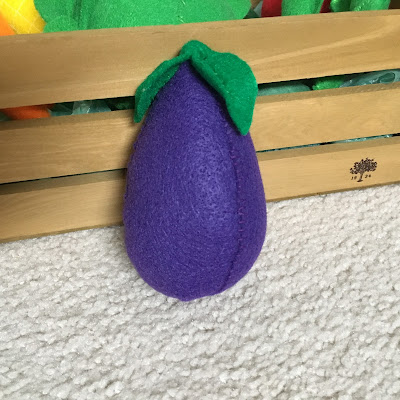
      So I thought it a crate of felt vegetables would be a cute addition to the serving table.  So this is what I came up with. A head of lettuce or cabbage, carrots, pea pods, an egg plant, a corn on the cob, and an apple or tomato.
     
    When this baby grows into a toddler, they will have play food for kitchen. Every child needs to have dramatic play in their day. So what better way than to give a crate of "fresh vegetables" to include in the play. The bright colors are a stimuli for the senses and great for color recognition.

          Here is my attempt at a head or lettuce or cabbage


         These are more like baby carrots.


                       The peas in a pod.


              I love the color of the egg plant.

             Yellow sweet corn is ready for some melted butter.


           I suppose this looks more like an apple but it could be a tomato if the stem and leaf were a little different shape.

     I added a crocheted pale yellow chick to keep an eye on all the veggies the crate. 

     So if you are looking for a gift from the heart for a child, give these colorful, felt veggies a try.

Beti

Thursday, March 19, 2020

Little Blue Bunny

Hello Blue Bunny


                Bunnies are so sweet and cuddly.  I needed a quick Easter gift last week.  So,  I looked in my stash of material scraps and found this blue check cotton material.  I cut a square about 8 x 8 inches.  Then a quick hem was sewn around the edges.


        A basting stitch was made along the green lines. White thread was used, so that is why I placed the yarn on the fabric where the basting was done.


        When the basting thread was pulled to gather the material the  bunny's head and ears take shape. 


      Stuffing is added to form in the head first.  Finally the body is stuffed and sewn shut.  


         I added a pom pom for a tail and a soft ribbon around his neck.  Fabric paint was used for the eyes.  This little bunny was given to a 16 month old. 
Just the right size for little hands to hold and cuddle.


       This was a quick and easy gift for any child.  I'm sure you could make one larger if you so desired.  

     Here is a link to another post.  In this post I made a similar bunny only knitted as seen below.
http://betikempa1.blogspot.com/2017/04/knitted-bunny.html 


Happy Sewing!  

Beti

Wednesday, March 18, 2020

Knitted Bunny

              Knit Bunny

    I was browsing Pinterest the other day when I ran across a post that gave free instructions on how to made a cute little  bunny from a knitted square.  I was so intrigued that I had to try my hand at this simple project.
     I want to give credit to www.gina-michele.com

http://www.gina-michele.com/2016/05/one-square-stuffed-bunny-knitting.html 


     She called it "One Square Stuffed Bunny" knitting pattern.  And it was Free! 
 Thank you Gina Michele!


        To begin, use size 10 needles and cast on 24 stitches.  ( The pattern said to use size 13, but the largest I had were size 10).  Knit one row and pearl the next row. Continue the pattern until you have a knitted a square. ( Gina Michele wrote instructions to cast on 24 stitches and knit 24 rows. ) Please go to her blog because her instruction are much better than mine.

   
       Using a yarn needle baste a line across the middle of the piece and then up to the top and back to where you began.  You should have a triangle that looks something like this. I used a contrasting color so it would stand out in the picture.  You can use the same color yarn so it doesn't show in the finished bunny.

  
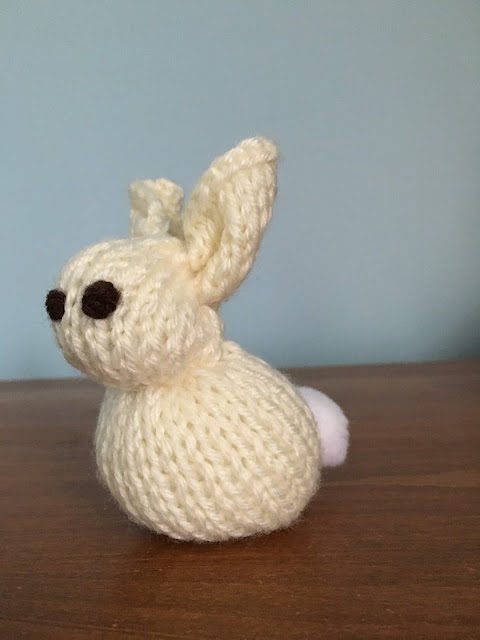
   When you begin to pull the ends of the yarn the bunny's ears and head will take shape. This is the view from the back of the bunny.  Before I stuffed the head, I added the eyes and nose. He looks a little sleepy!  ( It was easier for me than sewing it after the bunny was completed.)


       The bunny is beginning to take shape and getting a personality. Stuff the head.  Pull the basted yarn tight and stitch the back of the head and down the back.


      After the back is stitched, stuff the body. Now run another basting stitch around the bottom of the body.  You may have to add more stuffing as needed.
Pull the basting stitch to tighten up the bottom to close the body. Make a knot to ensure the stuffing is enclosed.


      This little guy needed a cotton tail.  I used a white pom pom which was stitched to the backside of the bunny.  You could make your own pom pom if you are so inclined.

    Here is a great and quick little knitting project that is fun to make and just as much fun to give away to a child this spring or in an Easter basket.  I hope you enjoy making these bunnies as much as I did.

     Today I have linked up with Doodle Bugs Teaching on the Five for Friday weekly linky party.
www.doodlebugsteaching.blogspot.com 
Please follow the link to check it out.


It is never to early to Think Spring!

Please leave a comment. I enjoy reading your messages.


Beti

Tuesday, March 17, 2020

Bunnies and Eggs

Paint Chip Bunnies


      In Spring I need to engage my students in thinking about our Easter service project.  My students make and fill  Easter baskets for a local food pantry.  Here are some of my students with the Easter baskets that they have stuffed full of candy, toys, books, school supplies, and of course a stuffed animal.


      The baskets all need to have a tag.  The tags identify if the baskets is made for a "Little boy" , "Little girl",  Older boy", or "Older girl".  I went to the paint department of local stores to collect paint swatches to make these tags. Large tags were used for the bunnies and small swatches became the eggs. Bunny and egg templates were made from tag board for the students to trace before cutting.


         This young man is working on cutting out a bunny shape the he traced on the yellow paint swatch. You can see a completed purple bunny along with a pile of egg shapes on his desk. He has been very busy.


    A large pile of eggs has been finished by this young lady.

   One more purple bunny is coming soon.

   
            These paint swatches have such wonderful colors.  I try to pick Spring colors. There are so many colors and shades to pick from. The paint departments always have an unending supply.  My students are very diligent when cutting out the eggs and bunnies.  I am so very proud of my 5th graders because they are kind and generous. They enjoy making things to give to others.

Think Spring!
Beti