Thursday, April 30, 2020

Puppets

 Puppets, Puppets, Puppets!

            I have made puppets with my 5th graders for at least the last 15 years. It was a year long project starting with the collecting of the light bulbs and culminating with puppets shows for  parents and doing traveling puppet shows for other the students in our school. 
   
             I retired last June.  My friend, Cindy, switched grades and took over teaching my 5th grade classes. Cindy wanted to continue making puppets this year if I would come in and walk her through the  process of paper mache', painting the faces, gluing on the hair, beards, and mustaches, designing and making the clothing.   I had a great time working with the kiddos and being able to leave the mess (only kidding) behind. 

          When working with the paper mache', I found that most of the students had never used the paper mache' paste or art paste.  Many of the kids would be upset the first time they touched it. The paste feels quite slimy and some children didin't like that sensation on their hands.  So, I always try to make a joke of it and say it feels like slime or snot.  Of course, all the kids make a awful noise but are intrigued. I tell them to only put two fingers in the paste at first. It gets most of the kids over that first touch and things go smoothly after that.
  
        After we have completed the first two coats of paper mache', the kids want to wash their hands. I tell them to rinse off their hands with water only.  If you wash your hands with soap you will make an incredible amount of bubbles. One of the boys came back after cleaning his hands.  He stated that his hands felt like "Grandma Hands", meaning they were so very soft.  I had to laugh.

        Here are some of the finished products.  I just love them.  Every year the students manage to amaze me with their creations.


Doesn't she have the most precious face?


His necklace adds a sparkle to his face.


His eyes and eyebrows intrigue me!


The green dress brings out the color of her eyes.

                    I love the expressions on their little faces. Everyone is different with hair and eye color, beards, eyelashes, and smiles.


                Just in case you were wondering about the style of clothing , the puppets represent people from the Bible. The women are wearing a veil, crown, or some kind of head covering.   Some of the Bible stories presented as puppet shows were Noah's Ark, David's Giant Faith, Jonah and the Whale, Moses and Water from the Rock, Jacob and Esau, and  The Birth of Moses to name a few.

             Making these darlings is a long process, but very rewarding for the students in the end. I do hope Cindy will continue to have the kids make puppets in the future.


 I have  linked up with 4th Grade Frolics. Please stop by to see her new classroom for the fall.
www.4thgradefrolics.blogspot.com
    

 Please leave a comment if you have a spare minute. I'd love to read your thoughts.


Beti

Wednesday, April 29, 2020

Felt Matching Game

 Felt Matching Game


           I love to make toys for my grandchildren from felt and flannel material.  I found this piece at JoAnns and thought it would make a cute matching game.  The bold colors and cute, simple  illustrations would work nicely.


         The first step was to cut the squares apart and have 2 of each design. Next, I cut squares of felt the same size.  The sewing was simple, just zig zag around each square. Easy Peasy!


          This little game can be used as a simple match game or as a memory game for a older child.  Color recognition, learning letters, opposites, and beginning reading are all possible using these squares.  Where is the dog? Can you give the dog a kiss? What does the dog say?  Can you find the green tree? Where is the wind mill?  Blow the wind mill like this. These are many of the possible ways to use this simple toy.  It is nice and quiet because it is made if of very soft material.


        These can be easily popped into a tote bag for quite play while on an airplane going on vacation or at a restaurant.  

 Enjoy your day with your family and friends!
  Beti

Saturday, April 25, 2020

Puppies Quiet Book

Puppies!
  Puppies!
Puppies!
 

               On one of my excursions,   I was wandering around JoAnn Fabrics and saw a darling piece of flannel fabric with these cute little dogs.  They were so colorful with friendly facial expressions.  I could not resist buying a yard.  I knew it would be perfect for my next quiet book.  By purchasing fabric with cute graphics, I can spend less time constructing my quiet books. 


          Five little dogs of different colors would be great for color recognition and matching. 


         I cut around the dogs and zig zagged the matching colors back to back.  I was lucky enough that the dogs were facing in opposite directions so they could become two sided dogs.

          Each puppy needed a bed of the same color to sleep in.  Little pockets felt were sewn on for the dog beds.


       I added a light purple dog dish with water and food just in case the puppies get hungry!  As you can see the little yellow pup is having a snack from their dog food dish.  Yum!


      On the back cover a red dog house was added.  All the dogs can fit into the dog house.


       There is a snap at the top of the dog house so all the pups can fit in.


       A handle made from ribbon was added along the binding so the book can be easily carried by small hands.

     
           Today I have linked up with Doodle Bugs Teaching for the Five for Friday weekly Linky Party.  I enjoy reading Kacey's blog. She has so many great ideas for the classroom. Check it out!

www.doodlebugsteaching.blogspot.com

    
  Please leave a comment if you have an extra minute. I'd love to hear from you. Enjoy your day!

Beti

Thursday, April 23, 2020

Southern Colonies Flip Chart

FLIP CHARTS 
are your friends!

        At this time of students learning at home, this might be an idea for students to bring all their knowledge on a subject in one place. Students need different ways to study and learn.  Why not give flip charts a try!
        
My 5th graders enjoy making flip charts to sum up information. They add illustrations to help remember specific information.
    
     To wrap up the Southern Colonies a flip chart was perfect.

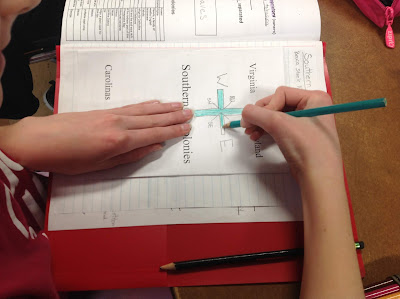
    This is the outside of the flip chart decorated and glued onto a piece of loose leaf paper.


         Each student received a sheet that had this information for the Southern Colonies. The paper was flipped over to the blank side and folded in half.  The flaps were opened and then each was folded into the middle fold.


  The inside of the paper was divided into four sections, Virginia, Maryland, Carolinas, and Georgia. Then the section for the Carolinas was divided in half.


    The students wrote the name of each colony in the correct section to match the outer flaps.  The following information was added by the students.
Founder, Reason for  founding,  Economy, and Geography.
  
     I let the kids go to it.  Encouraged to add illustrations and color, some kids go all out. I am always very impressed with their work.


        You can see that this chart is securely in place their Social Studies duo-tang. This way the student can refer back to their notes when working and when reviewing for a test.

     My 5th grade students have learn to used flip charts successfully.  I hope they will used this study technique in the future. 

     You can check out my other blog posts on working with flip charts. Hopefully they will be useful with your students, too!
     
      Please leave a comment if you get a spare moment. I love reading readers thoughts.

Beti 

Monday, April 20, 2020

Ice Cream Cones

  I scream,
you scream, we all scream  for  
ice cream!

   What child doesn't like ice cream? Of course I wanted to make an ice cream play set for my granddaughters imaginary play. While shopping at JoAnn Fabrics, I ran across this darling piece of flannel material with sparkling ice cream cones. Perfect!  Of course I bought a yard!

   
       I hope you can see the little sparkles on the delicious ice cream. I think the sparkles make the ice cream so inviting!  The smallest cones are about 2 1/4 inches tall , while the tall four dip cones are about 3 1/2 inches.  The perfect size for little hands to feed to a favorite doll or friendly stuffed animal. There are 18 different varieties, some with sugar cones and some with cake cones. Some cones are soft serve and some are scooped. Of course don't forget the sprinkles or the cherry on top!  


     First, I cut four of each cone. I wanted to make two sets.
The material was matched wrong sides together, zig zagged  stitched, and trimmed. As  each cone came to life,  I smiled and knew they would be enjoyed and played with. Each was cuter than the next.  No sharp edges for my little ones to get hurt. 
                   Just soft ice cream fun.


     Using Altoid tins, a piece of felt was glued to the lids with tacky glue.  Then some left over felt ice cream was glued to the felt.   Now we have a little storage case for all of our ice cream. 


COMPARE AND CONTRAST
     Even though all the cones are different, you can still have your child find       similarities. 
  * Find all the cones with a cherry on top.
  * Find all the cones that have one scoop if ice cream.
  * Find all the cones with blue ice cream. 

      These little ice cream cones and their tin carrying cases were so much fun to make. You don't have to be a great seamstress to make something like this.  Just the energy to cut, match , and sew.  I'm sure your little one would be happy to help in the matching process before you do the sewing. Get your kids involved in any project,  and they will feel more connected when it is done. Hopefully, they will have ownership and pride in their new toy and want to keep it all together and not lose any of the pieces.

     I do hope that I have inspired you to make a simple toy for a child in your life to play with.  Nothing fancy, just hours of imaginative play. 

   Please leave a comment.  I'd love to read your thoughts.

Enjoy this beautiful ICE CREAM day!

Beti   

Thursday, April 16, 2020

Spring in Michigan

Spring in Michigan
Coming Soon! 

      Spring in Michigan is so lovely. Sure, it can be rainy and cold. But it always gives us something beautiful if we wait long enough. I am so looking forward to the warmer sunnier days to come.

        I was away for a good part of April and this is what I came home to see. Yellow and white daffodils and narcissus stand so tall and wave in the breeze.


  My red bud tree has never looked this striking and full of color. My husband trimmed it back last year. 


  We have hundreds and hundreds of these grape hyacinths in the yard.  They multiply like crazy. I love to look out and see all the bright colors against the green grass.  There are a few dandelions popping up.  I guess I'll have to get out the weed killer soon.
           The squirrels always have a great time playing in the spring time.
      

            The bright red cardinals look so beautiful against the new green leaves.

           My crocus are the first to come up.  They make me smile.
 Spring is the most wonderful time of the year. If you have a few minutes, go back a few posts. You can see the baby hummingbirds that I had the privilege to watch hatch while I was away.  The mother hummingbird took time to feed on the flowers in Arizona, and I had some time to take pictures of the babies. 

Happy Spring to all!

Beti

Thursday, April 9, 2020

Smile!

                                          This is my daughter's puppy, Barkley, a little Yorkie. He is very lovable and loves to snuggle in for a nap.


                                            What more can I say?

                                            Enjoy your day.  He is.


Leave a comment if you like.  It is always fun reading your comments.
Enjoy!

Beti

Wednesday, April 8, 2020

Felt Food

Felt Food!
Yum! 

            I have been looking at all the posts on Pinterest concerning everyone making felt food. It looked so appealing and didn't seem that hard to make, so I thought I would give it a try.  My granddaughters have play kitchen sets, so this would be the perfect addition to their dramatic play.

                  I started out with cookies.  Round pieces of felt sewn to look like sandwich cookies were so simple to do. Adding a little bit of hand stitching to one side made it look like a frosting design on top.  I was able to work on these on the airplane or in the car when traveling.  The chocolate chip cookies were also fun and easy. Little brown, round circles stitched to the large top circle was quick to do. Some tiny chocolate chips were created with French knots instead of felt circles. Then the top and bottom were stitched together.


            Pasta was a quick and easy food to make.  My pinking shears came in handy when making the ravioli and bow tie pasta. I stuffed the ravioli with little bits if left over felt from cutting the cookies. These went together in no time at all. Very easy for a beginner sewer.


         Fruits and Vegetables were other food groups that I decided to work on.
The strawberries were also fun and easy. A half circle of red felt and a few stitches of tan embroidery floss made the strawberry come together quickly. A little green star shaped piece of felt was sewn on the top for the leaves and stem.
         The corn and carrot are made with the same basic shape. When working on the corn I machine stitched the felt in a checker board pattern to make the kernels of corn. The side seam was sewn next. Then the top and bottom were gathered to finish each piece. A piece of cream colored felt was sewn on one end of the cob to make the flat end. Green felt was added to the carrot for the leaves.

  
        All the fixings for a sandwich would be a good addition to the felt food collection. Making the bread was a little more tricky than I thought.  It didn't turn out as well as I would have wanted. But once you put all the pieces together, it will pass for a pretend sandwich. The cheese slices were just pieces of felt.  You can't get any easier than that!


        Egg and toast is all you need for breakfast. 


        I just had to make some desserts! Donuts and ice cream of course!          A kitchen would not be complete without dessert! These were so much fun to make.  I smiled the entire time working on them.


        I know that my felt food doesn't meet the standards of the food you might find on Etsy, but I hope my granddaughters will enjoy playing with their assortment of felt goodies for years to come. 

Tuesday, April 7, 2020

Happy Easter


Happy Easter   

 Hello from the Easter Bunny!


     I saw the Easter Bunny today.  He wanted me to pass along his Easter greetings.  This friendly furry fellow always has a twinkle in his eye. When we see him we know that Spring is here and the flowers are beginning to bloom. 

        I guess the Easter Bunny has an assistant this year! You never know who will make an appearance at the Easter Parade !


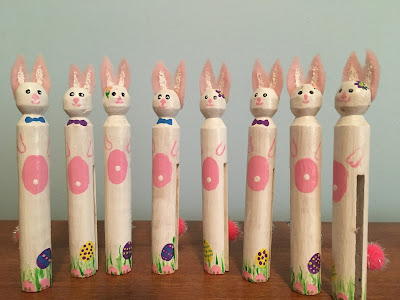
                    Here are a few of his friends ready to hide their eggs.

    When we are outside the air is fresh and clean. The birds are very busy flying around looking for worms in the fresh grass.  Robins are tweeting and making their nests.  They will lay their eggs very soon. Take advantage of the nice weather and get outside and enjoy our beautiful world. 


Happy Easter!

Beti