Wednesday, September 30, 2020

How Sweet it is!


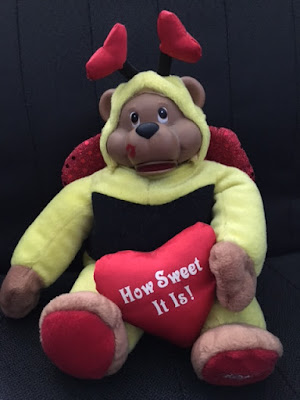
       Years ago, one of my students, Natalie,  gave me this cute singing bear.  Year after year , he has sat on a self in my classroom watching over my classroom.  When you press his right foot, he sings "How sweet it is to be loved by you!" He also sways back and forth. 
        When I needed my students to line up or get ready quickly, I would make him sing. The kids loved it. It was a great stress reliever.  Some students needed an incentive, so I would say, " We need to do "this" before the bear stops singing".  
       Yesterday, I turned in my school keys for the last time.   I retired after 25 years of teaching. So my little singing bear has come home with me.  He makes me smile and remember all of the students who came to my homeroom. 

Teaching.... How Sweet It Is! 
Enjoy the summer! I will!
  Beti

Baby Bunny Costume

          A Baby Bunny costume is my latest creation.


        I like to make costumes that are easy for a child to wear and can be worn after Halloween.  Kids like to play dress up and wear favorite outfits. I hope this one will be enjoyed by my granddaughter.

        I saw a pink long sleeve shirt and this cute little scooter skirt on the sale rack, of course. It did have an applique of an elephant holding a balloon with his trunk. This needed to be covered with the bunny applique. That is why the shoulders were added beneath the face. If you look closely, you can see a faint dark spot under the cheek of the bunny.  I used felt for all of the details to make the face.  The eyebrows, mouth, and whiskers were stitched with black and brown embroidery floss.
  
      The last touch was to make a puffy bunny tail. I know the colors are not an exact match, but buying from the sale rack you have to take what you can get. If it is cold she can wear white tights or leggings to keep her little legs warm and cozy. A lot of times little ones don't like to wear anything one their head. I know she has a head band with bunny ears from last Easter. Maybe the head band will be added to the costume.

          Please leave a comment if you have the time. I'd love to hear from you.

  Happy Halloween to All! 

Beti

Sunday, September 27, 2020

ELMO for Halloween

                My granddaughter loves Elmo.  So I needed to make her an Elmo costume for Halloween.  I went out and found a bright red onesie with a 4th of July theme stitched on the front. Would you believe I found it for $1.20 on the clearance rack!  It was impossible to find a plain red onesie at any local store. Everything has some sort of cute decoration.
 So I improvised.....


         I sewed a piece of red felt with a zig zag stitch onto the onesie. Then the white eyes with black pupils were stitched on. Next, the big orange nose and the smiling black mouth.

         I purchased 3 yards of red tulle to complete the costume.

       A two layered, four inch strip was cut off of the the entire 3 yard length. Now I had two pieces, 4 inches by 3 yards. This was folded in half, lengthwise, to make a 2 inch piece with four layers. I ran a basting stitch the length of the material  1/2 inch from the edge.  The thread was pulled to make the ruffle around Elmo's face. * The ruffle was then sewed in place by hand.  I had to made sure that it was not sewed too tightly or the onesie would pucker. 

     The remaining piece of material was folded in half fold to edge. This piece was about 12 inches by 3 yards. Again, a basting stitch was sewn about a half an inch from the folded edge. The thread was pulled to gather and make a large ruffle for the skirt.

    * Actually, the skirt was sewn onto the onesie first and then the face ruffle was added after so the face ruffle would overlap the skirt ruffle. 

        A child could wear this with red tights, leggings, or pants if they needed to cover their legs in case of cold weather.  You could leave off the skirt if it is intended for a boy's costume.

     This was so much fun to make. I looked a a lot of Elmo pictures on line to get inspired.

      Happy Halloween to All!

Please leave a comment if you have the time.  I'd love to hear from you.
Beti 

Thursday, September 24, 2020

Symmetry Skeletons

        Symmetry Skeletons     

    Halloween lends itself to a lesson on symmetry very well.  The lessons of symmetry have been in Math books from 1st grade.  I use this with my 5th graders. So a short bit of review may be necessary for some vocabulary terms. When you show the kiddos that they are going to be designing skeleton heads, they are ready and willing to work.

 Today I am linking up with Forever in Fifth Grade for the October Show and Tell Tuesday.
www.foreverinfifthgrade.blogspot.com


    First folding the paper is necessary to form the head shape.  The fold can then be used as the mid line for the correct placement of the facial features and extra designs. Markers, crayons, and some scrap paper and glue is all the students need to complete this project.
 

      This lesson can be related to Dia de Los Muertos   or  Day of the Dead which occurs on November 1st and 2nd. 


 As you can see, each student has their own impression of how each skeleton should look.


I hope you have a wonderful 
Halloween  this year.


Please leave a comment. I'd love to hear from you.

Beti

Thursday, September 17, 2020

Cloth Dinosaur Book

Dinosaurs

            I was shopping at JoAnn Fabrics the other day an found a flannel fabric with colorful dinosaurs.  This would be perfect for soft cloth  dinosaur books for my wonderful young grandsons.  3/4 of a yard was all that I purchased.


             Please excuse the picture of the fabric being oriented vertically instead of horizontally.  But  I'm sure you can see how cute and colorful these dinosaurs are.

         Bright orange stegasaurus, lime green triserratops,  sky blue brontosaurus, along with grey and tan T-rex are all there roaming around cactus plants.  You can almost hear these dinosaurs ROAR!

           The different dinosaurs were cute apart and laid out on the base navy blue material. I just did a rough cutting to begin with. The two blue dinos will eventually be on the last page of the book.  The orange dino will be on the cover of the book.


     As for the three dinos in the following picture , these will be located in the inside of the finished book.  This picture shows the continuation of the blue fabric.  It is one long piece of blue material.


        Next, the dinos were sewn with a zig zag stitch to the blue base fabric.  The excess is trimmed close to the stitches. If you look closely, you can see a fold next to the blue dinosaur on the right. There is also a fold in the blue fabric to the right of the Orange dino.  This is where the book will be folded when finished.
       I love the way these three are following each other.
No fierce, fighting  in this book!  Only friendly reptiles on parade.

       This is what the completed cover looks like.  The oval at the top is a flap with Velcro.  The flap closes the book securely.


         Look who is hiding in a secret pocket!  There is a set of dinosaurs that match all the dinos in the book.   Each dinosaur is backed with a matching colored felt.  The flap helps all these friends stay safe.


       Can your little one match the colorful dinosaurs?


      All the dinosaurs can roam around or get together with their new friends.  Children can use the soft cloth dinosaurs  in their imaginative and creative play.


       Make a cloth book for a young child in your life. It is very easy and fun. Just take a walk down the fabric aisles at JoAnn Fabrics.  I' m sure you will find some design that you like.

 Happy Sewing!

Beti


Thursday, September 10, 2020

Baby Boy Doll Clothes

Baby Boy
Doll Clothes 

          Dolls and doll clothes are so important in the development of young children. Dressing yourself and a doll or stuffed animal are wonderful activities to develop self reliance. Every child needs fine motor activities.  Little boys and girls enjoy this type of activity so very much.

          My son-in-law gave me an old pair of  pants in the camouflage pattern. I thought it would be fun if the dolls has pants or shorts made from this fabric. I guess you could call these long shorts or short pants.


         The shorts have a pocket on one side. I thought it would add a little extra.  Little Boys and girls love  pockets.  It is a perfect size to place a special trinket for your dolls.  I made these with a waist band instead of elastic.  The aterial was somewhat heavy. If you are using light weight or knit fabric an elastic waist would work as well.


        The  T-shirt has a neckline made from a strip of the T-shirt material.  I like this technique because I get a nice clean neckline.  I used the T-shirt material for neckline trim even when the shirt is made from a woven material.  Velcro was sewn to the back seam edges. It makes it very easy for the young child to dress their dolls.


           As you can see the T-shirt has a long length.  It can be tucked into the pants or shorts. You can make it shorter if that is what you need.


           These are the patterns used for the shirts and shirt. The patterns  are on a  one inch grid and can easily used in woven or stretchy material.  The length of the shorts pattern is 5 1/4 inches as you can see on the grid. This measurement can be made longer if you want full length pants.

         The shirt with sleeves are made in one piece.  This makes it so easy! The length of the shirt can be made shorter or made longer to make a dress or nightgown. The pattern is very easy to adjust if necessary.

              
             Both the shirt and shirt were made from scraps of material I had in my scrap box.  So, you can see that the amount of fabric need is minimal.

       I do hope you can use these patterns and ideas for the doll clothes that you are making.

  Happy Sewing!  


Beti          


Friday, September 4, 2020

Polar Bear Amigurumi

       Hello,  Mr. Polar Bear!


          Here is my newest Amigurumi creation!  A white polar bear with a red scarf.   He is ready for the cold weather wrapped in a cozy scarf.  This little guy is about four inches tall and about three inches wide.  You could say that he is on the chubby side.


         Mr. Bear is just waiting for someone to love, play , and sleep with.

    He was very easy to crochet using only single crochet stitches in the round.

If anyone would like the pattern for my Polar Bear, please let me know.

Happy CROCHETING!

Beti

Thursday, September 3, 2020

Martin Luther and the Reformation

Martin Luther 

       I taught a Social Studies lesson on Martin Luther, the Reformation, and the Protestant Religion.  I have had real success with interactive notebook pages this year with my students. So, this is my attempt to explain the concept.

      The homework tonight was to teach your parents about Martin Luther, the Reformation, and the Protestant Religion.  
      
       These are the church doors... When the paper is folded the students were instructed to write 15 in the left side door near the edge of the door and 17 on the right side door near the edge of the paper.  When the doors are closed you can read the date 1517.  In the same way, the words Catholic and Church are written.  The door handles were added next.  Finally, the sheet with 95 reasons that Martin Luther was dissatisfied with the Catholic Church are mailed to the door.

      
        This is the inside with the picture of Martin Luther. Sorry for the blurry picture.


The center section where the students had to fill in information.


        This is my model of the outside flaps which became the doors.  After  I drew the nail on the paper with the 95 reasons, of course I hammered  on my desk, just for the effect.  The boys loved it and pounded on their desks, too.
   
     Here you can see the finished product glued onto loose leaf with the title included.


       The students' homework is to used this Flip chart to explain to their parents who Martin Luther was and what he did. If a child can explain a concept to an adult or another student they have the knowledge of the material and information. 😃  

          Flip Charts are a fun way for the students to learn information with a hands on project.


Beti