Saturday, December 19, 2020

Roanoke, The Lost Colony Flip Chart


       I LOVE FLIP CHARTS!!!
           
      The 5th grade curriculum in Michigan includes a  lesson on the Lost Colony of Roanoke.     Along with reading the lesson in our text, taking notes, a Study Stack, and a short video clip I added a flip chart to make a short lesson summary.    My students like the hands-on work of a flip chart.  

        I found that children need the tactile experience when learn even in Social Studies. Turning the flaps back and forth, opening and closing reinforces learning.   These are easy enough to make in a class period.     If you choose to make a second or third flip chart for a later lesson, your students will feel confident and comfortable making  flip charts and the instructions will be minimal. 

            😀 Happy teacher  = 😁 happy students!
                         It's a win - win situation!


       As you an see,  I have the kids glue their flip charts onto loose leaf paper.    This way 
the flip chart can be clipped into their Social Studies duo-tang so it  does not get "lost ".

     My students enjoy doing a little added decoration to their flip chart.  
I'll do just about anything that will give an incentive to study.      Some students use more color and symbols, while others draw stick figures, add speech bubbles, captions, and arrows to enhance their work.     Each child learns by using their own style.       What works for one might not work for their neighbor. 


      The inside of the cover flaps can be used to write additional facts.    The student is able to write pertinent information on the lines of the loose leaf paper.   After the flip chart is complete my students enjoy sharing their work with their classmates.     In this way the next student can possibly learn additional information by reading a different flip chart than their own.    They can also learn from looking at the illustrations.


Please leave a comment.  I love to hear if someone can use my ideas.


Beti

Wednesday, December 16, 2020

Baby Candy Canes

    First Candy Canes
 
This one was made by my son when he was about 2 and a half years old.


           Christmas is a perfect time to get out the finger paints for you child or children.  Tag board or a file file is a perfect weight paper to work on.   The file folder stays in place and does not wrinkle or bend with the movement of little fingers.


        I drew the outline of  three candy canes on a file folder. Then the  red finger paint came out!!! Oh what excitement!! The squishy feeling of paint on your fingers.  The paint is applied to the paper with such zeal! 

         After the paint was dry, I cut the candy cane shapes out.   Of course the names of the artist and the year were written on the back to look into the past many years from now.

       This is my 18 month old granddaughter's candy cane for this year.


      My daughter made this candy cane below, more than 30 years ago.  She was about 8 months old at the time.   It looks as good as new!  These fans canes are always hung on my tree with care just like the fragile glass ornaments.   They are so precious to me!

   
          These precious candy canes will have a special place on my tree every year.

     Christmas tree ornament don't have to be made of finest silver, gold, or crystal to be cherished.  

Hoping everyone has a very Merry Christmas! 

Beti

Tuesday, December 15, 2020

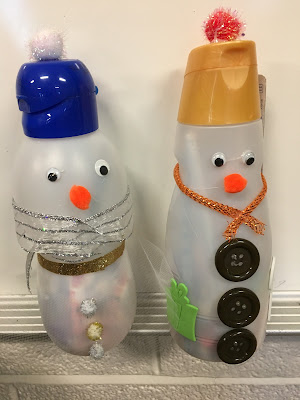
Coffee Creamer Snowmen

Start saving your empty coffee creamer bottles now!

Let it SNOW!
      
                     Today is Snowman Day!!!
   Are you looking for a fun recycled materials project for your class?  Well here it is!

      The fifth graders have been saving plastic coffee creamers since September. Our goal today was to transform the ordinary plastic bottles into something very special, individual, and  unique. 


     Using a varied collection of ribbon, buttons, google eyes, pom poms, and who knows what else, the children go to work.


     Each and every snowman is  as individual and unique as its maker.


         When the designing is complete the students fill their snowman with candy, pencils, erasers, money, and some get a toothbrush attached to the outside.


This guy looks like he lives on Sesame Street!
         These darling snowmen will be delivered to a local food pantry.  We hope they will bring joy to the children who receive them.


          I love to do this project with my students. The children begin to understand that they can do something for someone else and have a great time. 

Enjoy the Christmas season.
Merry Christmas 
to all and to all
 a good night! 
 
Beti

Monday, December 14, 2020

Felt Santa Ornament

HO, HO, HO! 


           It is never too early to start planning for Christmas.  If you like to make handmade ornaments like I do, you need to start thinking about it now!
   
          I was browsing though Christmas ornaments in a small shop in Minnesota a few years ago and came across stuffed felt Santas.  I knew that I could make them. 


      So off I drove off to JoAnn's to pick up some red, black, and white felt.  I was out of town in Minneapolis at the time, so I didn't have all my felt scraps on hand.


     These are the little guys I came up with for my granddaughters that year. A little embroidery and a little stuffing. At about six inches tall, they are the perfect size for little hands. My Santas came together quite quickly. No sharp edges to poke a finger or loose eyes to come off. These little Santas can easily hang on the tree or can be played with and taken to bed for a nap. 


    Happy Santa Making to all and to all a Good Night! 

Beti

Friday, December 11, 2020

Who is driving?


      While shopping the other day, I looked out the side window of the car.    We had just pulled into a parking space.    The car next to me had a well dressed driver ready for the cold Christmas shopping season.

      The driver was was calm, not at all frazzled like so many of the shoppers this time of year.     Warm and cozy in a red jacket, just watching the world and the other shoppers go by.


     More of today's shoppers could take a lesson from this driver. Taking one day at a time.

     Please have a calm, blessed Christmas. Try to remember the real meaning of Christmas.

Tuesday, December 8, 2020

Felt Christmas Tree

          Christmas Tree 
 
         Manipulative activities for youngsters is so very important.    I saw a stuffed felt Christmas tree on Pinterest and was intrigued.  It looked like something I could make for my grandchildren and nephews. 
             
           Now is a great time to get started on an activity for you little ones for the Christmas season. 

           I made a form from cardboard which is about two feet tall.  The large triangle shapes were glued together using a hot glue gun.   I used tacky glue to fasten the felt to the cardboard tree.    Then the tree form was filled with styro-foam packing peanuts to keep it light yet firm.       Finally, the felt bottom of the tree shape  was stitched in place to keep the tree together. 
           
          An old Advent calendar with little felt ornaments happened to be in my basement. These felt ornaments hung on to the felt of the tree much like a felt board.  The ornaments were the perfect size for little fingers and my tree.

           My granddaughter is 18 months old.   As you can see, she spend a lot of time arranging and rearranging the ornaments on her little tree. 


               We all need those quiet moments to reflect on the real meaning of Christmas, even the very small child.

  So start working on manipulatives for the young ones in your family.   You will not regret it.

           I have linked up with Doodle Bugs Teaching for the Five for Friday Weekly Linky Party.     Lots of great ideas for the new year and winter months.
  www.doodlebugsteaching.blogspot.com 


      Merry Christmas to all 
and to all 
a Good Night!


Please leave a comment if you have a minute. I'd love to hear from you.

Beti

Monday, December 7, 2020

Felt Snowmen Ornaments

 Snowmen Ornaments


             Every year I make felt Christmas ornaments for my grandchildren.   Each year the ornaments take on a new design.   Last year Christmas trees were sewn.    This year I chose snowmen.   I try to give each their own individual personality.   This way the kiddos will be able to recognize their ornament. 

            On the back,  the year and the child's name is stitched.   I experimented with the decorative stitches in my sewing machine.   As you can see the snowman on the left has the years stitched by machine.    It wasn't exactly what I wanted, so on the other snowmen I did the year by hand.   Granted it took a little longer, but I think it looks much better.


             The faces are slightly different as well as the hats.   Each and every snowman made out of snow looks different.   Some are big and some are small.    Some are wearing hats or a scarf around their neck.   Some snowmen have sticks for arms and a carrot nose.   So these felt snowmen should be individuals, too!

              This smiling fellow has sparkles on his hat and a piece of  red ric-rac  to hang on the tree.


            This jolly  snowman ⛄ has a cute little smile with a green ribbon hanger.

         Give these little felt friends a try for you favorite children this Christmas.   You might even start a tradition, too.    Hopefully, these snowmen will hang on the branches of Christmas trees for many years in the future.

Happy Sewing!


Beti