Thursday, October 29, 2020

Day of the Dead

Silly Skeletons          
for 
Day of the Dead


          Each year my 5th graders have a Dia de los Muertos or Day of the Dead celebration as close to Nov. 1 and Nov. 2 as possible.    The students pick a person whose life they would like to celebrate.     The families talk about the aspect of their life and what the person looked like.      I have the students complete a research sheet to have all the details in one place. 

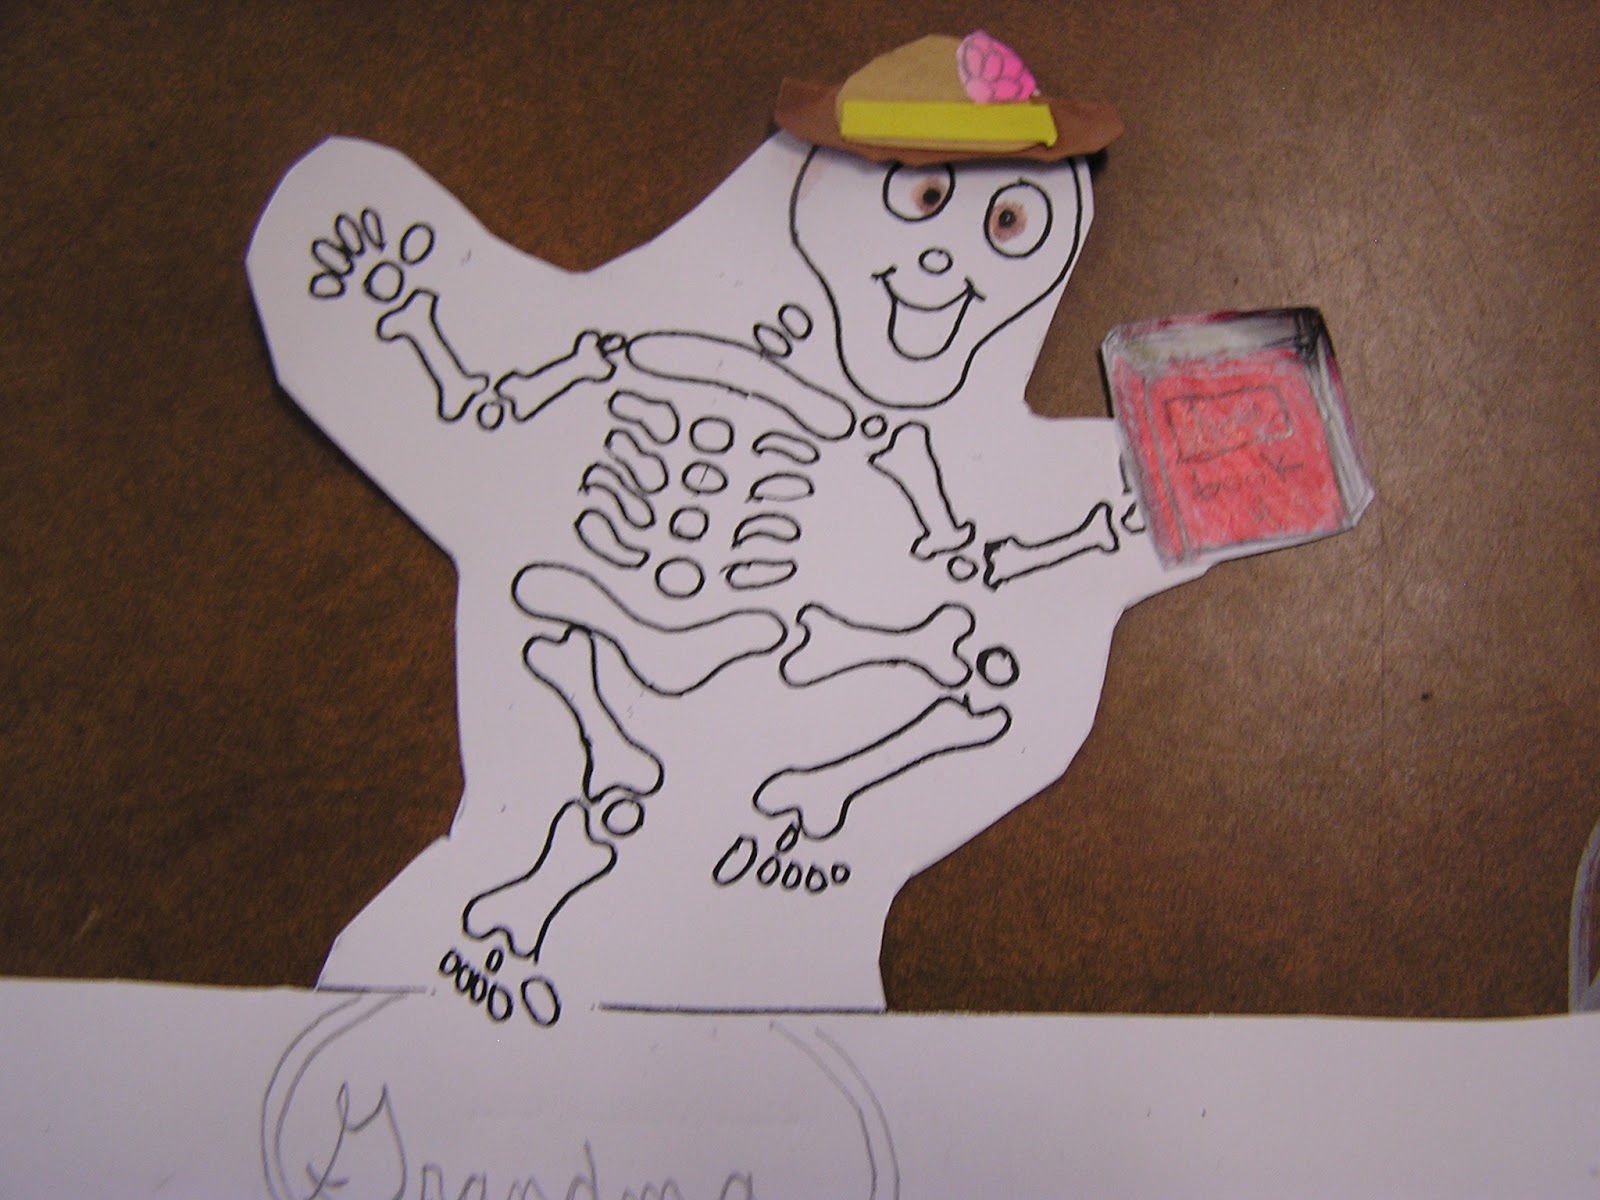
        We make little paper stand up skeletons for each person's life that we celebrate.    The instructions were to give the person a silly hat to wear and something that they liked, such as a favorite food or candy, in their hand.    You can see that the students had talked to their parents and knew about each person.


I am linking up with Doodle Bugs Teaching for the 
Five for Friday Linky Party -


     The students bring in a shoe box to make a small altar for the celebration.
A picture, candle, flower, and decorations are placed on a small piece of cloth used as an altar cloth. 

     Each child has a turn to speak about their person.     I encourage them to tell a funny story about this person.    This takes their minds off the fact that the person has passed on before us.

          This year I worked with the Art teacher to have the students make skeleton masks or sugar skulls.     In Mexico and Mexican neighborhoods in the United States, small and large skulls are made out of sugar for the Dia de los Muertos celebration.     It was a great lesson in symmetry.      Here are some examples of their sugar skulls.     The students used construction paper, crayons, and markers.


Please leave a message or comment if you get a chance.
Enjoy the beautiful day!

I have linked up with Teaching blog Addict for Freebie Friday.
Check out all the great ideas this week. 

www.teachingblogaddict.blogspot.com 

It's never too early to prepare for our Halloween activities.
Happy Halloween to all!

Beti 

Wednesday, October 28, 2020

King George Character Traits

           King George


    In order to integrate 5th grade Social Studies and Language Arts I read the story, Can't You Make Them Behave, King George?    By Jean Fritz to my Social Studies class.    We had just learned about the events leading up to the Boston Tea Party and the First Continental Congress.  

          I thought this would be the perfect book as a read aloud.    The kiddos participated by saying, "God save the king!" very enthusiastically with an  "English accent".    They also chimed in with a loud, "Huzzah"  after the American colonists dumped the tea into Boston Harbor. 

       After listening to the story, I asked the students about the character traits they could think of that reminded them of King George III of England.    How did he act, speak, feel, and act towards other people?    This was my jumping off place.


         This is the worksheet that I gave to my students.   The character trait is written in the box  on the left side of each section.    I like to add some kind of graphic to my worksheets. A picture is worth a thousand words.

         Here are some samples of my students' work.


        I do hope some other teacher can use this idea in their Social Studies  or Language Arts class.    It helps the students understand that this was a real person, not just another character in a story.     King George made a huge impact on the American colonists.


 You can also find this featured on Teach Junkie.com
<a href=”http://www.teachjunkie.com/”><img src=”http://bit.ly/1KnXxGz”></a>
       
      Please leave a comment if you have an extra minute.  I'd love to hear from you.  Enjoy your day!


Beti  

Tuesday, October 27, 2020

Ninja Finger Puppets


Ninjas! Ninjas!


            We see ninjas everywhere!    If you have read my blog,  I love to make felt finger puppets for my grandchildren and grand nieces and nephews.   In talking to my nieces, they mentioned that their boys like to play ninjas with their friends.   I should have known that.   So I decided to make a set of felt ninja finger puppets.

            A couple of years ago while on a family vacation, I gave each grandniece and nephew a little Altoid box with a little felt animal inside.    They were a hit with the kiddos.   So now when I get to visit the kids, I like to have some little handmade toy to play with. 

           My felt finger puppets are made from small scrap felt pieces.    These little guys are about 1 1/2 inches wide and 2 1/2 to 3 inches tall.      They are big enough to fit comfortably on your fingers and those of children, too.    I cut the body and other shapes free hand so none are exactly alike.      With a "pattern in my "mind's eye", the finger puppet begins to take shape.    So if you are going to make these, pick up your scissors and begin to snip here and there.      As you can see, black, browns, grays, and a green felt were used for the bodies.      Tiny scraps of red, yellow, and black were used for their belts.


             The only part that was hand stitched were the tiny eyes peeking out from each mask. The rest of the sewing was done by machine.   (Many of my finger puppets are completely hand stitched, but I wanted these to be a bit more durable because the boys will be playing with them.  

      Ninjas can be educational, too! 
             These little warriors can always be used for counting, sorting,  and matching activities.    Matching the belts or the color of the clothing could be fun.     Properties of same and different can be used in sorting.   They can also be placed in order from smallest to largest.      The educational possibilities  are endless.


          Give these little fellows a try if you enjoy making felt finger puppets!  I  do hope some lucky little boys and girls enjoy their ninjas!


Beti

Sunday, October 25, 2020

Fabric Travel Doll House

Fabric 
Doll House 


              There have been so many fabric doll houses on Pinterest lately.    Or maybe they just started to catch my eye.  I enjoy making toys out of felt and different kinds of fabric, so fabric doll houses would be a natural progression for me to try to work on.  


               Here is a look at the inside of my fabric doll house.      The house lays flat and can be folded for easy storage.      It measures 26 inches from top to bottom and is 2 and a half feet across.       At this point you can see pins around the edges of the house.      I was beginning to hand stitch the house together.
   
       The central section has a light blue gingham "rug" on the floor.      The back wall has the table and two chairs.      An large ice cream treat is waiting on the table to tempt anyone who comes to visit.      Hung on the back wall is a festive banner ready for any celebration.


         There is a picture of the family dog hanging over the warm cozy fire place on the left side wall.        Across the room is a Christmas tree with a smiling snowman button behind the ladder that leads to the upstairs loft


           The embellishments were made from scrap flannel fabric and stitched securely onto  the base fabric before the house was assembled.

         The green lawn is felt with a burlap path winding through the middle.  A small pond, trees, and flowers add to the outdoors feel. 

 
           The outside of the fabric house is also embellished.     A black front door with a button door knob is surrounded with a green vine with yellow flowers.       The vine was machine stitched and the flowers and French knots.     Next to the window is a felt mailbox and a tiny pink button flower to add contrast and dimension.     I stitched their last name on the mailbox in place of  the white label.     One side of the house has a wildflower garden made from assorted colorful buttons with machine stitched stems. 

         At the top of the picture you can see the striped roof with a pink ribbon.   This will become the carrying handle once the house is folded up.  If you look closely you can see loops sewn around the outside edge of the roof and front of the house.   These will be used with buttons to securely close the house when your child is finished playing. 
 NOTE:
      After my granddaughters played with their houses for a while, the elastic loops became unattached.     I will need to use velcro to make tabs to close the house more securely.       I learn something new every day!    And I am not ashamed to make mistakes.  That's what I told my students and now what I tell my grandchildren.    Live and Learn!


      The house walls and floor are reinforced with sheets of plastic canvas.  These light weight  sheets of plastic make the walls sturdy yet flexible. 


        Recently I  made some princess finger puppets which were  the perfect size for this play house!

             
            As  you can see the house has been played with and is quite durable. It takes the strain of a toddler sitting on and it it.

     This little house was so much fun to make and embellish.

  Happy Sewing!


Beti

Saturday, October 24, 2020

Popsicle Stick and Felt Ornaments

   Popsicle Stick Ornaments!  An easy creative project for school or home.
            It's never to early to plan projects!

         In the past years I tried popsicle stick ornaments with my 5th graders. I could have used tongue depressors, but all I had on hand were popsicle sticks.  They glued the sticks together on sheets of wax paper. Each child was given five pieces of felt, red black, green, brown and white to start with. Mind you everyone asked for more felt as the creativity went into high gear.  I always cut the felt into pieces about 2 or 3 inches square.  That way they don't waste felt.  The googlily eyes always add that something special.  I showed some inspiration pictures that I found on Pinterest and the kids started designing very quickly. Students gained inspiration from their peers. Each one was unique in their own charming way.


   The facial expressions are priceless!
Isn't this the cutest little Santa?


              Instead of painting, the students used their markers.    In the way we didn't have to wait for the paint to dry before they hey started glueing the felt pieces onto  to wooden pieces.      I' m sure the ornaments would have looked better, but we only had a short period of time to complete this project. 


    Some were completely covered in felt, as you can see with this snowman,  while others just had tiny felt pieces for accents.


Little pieces of thread were added so these little darlings could hang on the tree.


         Each one has the date on the back. Hopefully, the kids can look back in years to come and have fond memories of making each one when they were in 5th grade.


   I guess I'm biased, but I think they are very cute!

Today I'm linking up with 
Stephanie at Forever in Fifth for 
Show and Tell Tuesday
Merry Christmas everyone!

 www.foreverinfifthgrade.blogspot.com

 Merry Christmas  and enjoy decorating your tree!

Beti

Friday, October 23, 2020

Pueblo Project

  Southwest
Native American
Pueblo 


         All 88 of our 5th grade students participated in making our pueblo.  This project completed our unit of study of Early American Native Indian Tribes. My students didn't realize that this really was helping them study for their test. I didn't want to tell them or it would have spoiled the fun. The assignment for each child was to make a box, ladder, or kiva  for the desert southwest pueblo village.  I stressed that this was a child made project.


       This is only a small part of the items crafted by my 5th grade students this year.  Everyone had an opportunity to add something onto the pueblo because the Anasazi Indians  or the Pueblo People would have worked together to construct their pueblo to live in under rocky cliffs of the desert southwest region. 


      Here are close up pictures of the construction. Jello boxes, cardboard toilet paper rolls, and toothpicks were our building materials. Small pebbles and tiny twigs were added to the landscape after the building phase was completed.


          Many parents who come into the school commented on the pueblo project.  They were excited to see the results of the individual student work come together as a finished project.

       Finally,  I will have my students become TRAVELING HISTORIANS.  They will take the challenge, if they choose, to write about the pueblo and how the early Native Americans would have made it.  After reading over their information, students will be chosen to travel to other classrooms in the school, with the pueblo, to teach about the Indians of the Desert Southwest. By teaching others, my students don't realize that they are learning the information more in depth in order to to someone else. It is a win - win situation! My students get so much joy and and a sense of accomplishment by talking to the younger students about what they have learned.  The younger students learn that when they move into 5 th grade they will have these opportunities, too. 

      I have traveled to the southwestern United States and viewed some of the pueblos.    Exploring  the cliff dwellings of Mesa Verde was an experience of a lifetime.  Climbing a 30 foot ladder to get into the cliff dwellings was a real heart stopper.  My students are so intrigued that their pueblo looks so much like the real pueblos. 

       This project is so much fun for the kids to make in school. Every time it turns out to be different but yet the same. The great thing is that nothing has to be perfect.  Give it a try in your classroom. You won't be disappointed.

        
       Thank you parents for bringing your children to St. Michael Catholic School.  You are doing a great job raising incredible young ladies and gentlemen.  It is a real pleasure to teach our children each day.


 Please leave a comment if you have a moment, I'd love to hear from you.

Beti

Fidgets

    
Fidgets
 
        Let's face it, we all deal with kids who fidget and need to move. We can't do anything to stop it,  so we might as well give our kiddos something to relieve the internal motivation they have to move their hands , fingers, and feet.  Dodgers are so very important.  Adults as well as children  need fidgets.
 
      I hope all teachers have a basket of fidgets in their room for students to used at will. Not just the students who are ADHD or ADD.  Everyone now and then needs something to hold on to to touch.  When I am teaching, I usually have a binder clip, pencils, highlighter, etc in my hand. I too, am a very tactile person, so I know how my kids are feeling during class. 

       I know that my son has many things on his office desk. He told me that one of his teachers in high school, a very old priest, had a collection of toys on his desk. I guess you are never too old to have a toy on hand, just in case! 


        Here is a small selection of the fidgets I have in my 5th grade classroom. Foam stress balls, pencils with plastic screws and bolts, and little "porcupine balls" are just a few in the basket to choose from.  My students know they are not to be thrown around the room or at another person.  I am pleased to say it is working very well.

         One of my girls came up to me and asked if she could hold a stress ball because sometimes she feels stressed.  If we can make a child more at ease in class, then I say, "Go for it!"
      
     These small plastic cones are used as a reward for a great answer, but they also become something to hold onto during the remainder of class.  They are also beneficial in getting your shy or quiet child to raise their hand to offer an answer.


     Another option is to sit on a rug or a seat cushion while in my room. This is a very popular choice for many of my students. I have seen the kiddos holding on to the rug or just rubbing their hand on the soft material.  I would rather sit on something soft instead of a hard plastic chair, wouldn't you?


       I, myself, like to knit or crochet in the evening when watching tv. It keeps me busy and I feel productive when I have completed a project. I guess that I was one of those kids who needed a fidget when I was in school.

    Do used used fidgets in your classroom?  Please let me know what works in other classrooms.   

    Please take a moment to leave a comment or a note if you have the time in your busy day. I'd love to read your message.


Beti